
Fire resistant home remodeling Bay Area planning matters because wind-driven embers can enter small vents and ignite a home from within. A smart remodel treats the roof, walls, windows, vents, and nearby landscape as one connected defense.
Schedule a fire-resistant remodeling consultation with Golden Heights Remodeling
Fire resistant home remodeling Bay Area planning reduces wildfire risk by strengthening the building exterior and the spaces around it rather than treating each feature alone. It pairs Class A roofing with fire-resistant siding, enclosed eaves, protected vents, and double-paned or tempered-glass windows to close common entry points. The plan also addresses decks, fences, gutters, foundation gaps, and landscape areas where flames or blowing embers can reach the structure. CAL FIRE home-hardening guidance explains that embers can enter through vents and other openings, making a connected exterior plan important. A licensed design-build contractor can assess local requirements, rank weak points, and coordinate these connected upgrades through permitting and final inspection before construction begins.
Homeowners often ask which upgrades matter most and how to fit them into an existing remodel without missing a weak link. Before comparing materials and planning priorities, it helps to define What fire resistant home remodeling means in the Bay Area. The path begins with
What Fire-Resistant Home Remodeling Means in the Bay Area
A practical definition of home hardening
Fire resistant home remodeling in the Bay Area means reducing the ways heat, flames, and embers can damage a house. This work is often called home hardening. It can be part of a larger remodel or a focused set of exterior updates.
No material or building plan makes a home fireproof. The practical goal is to lower risk by replacing weak points with better details and materials. The Insurance Institute for Business and Home Safety Wildfire Prepared Home program provides research-based guidance for reducing wildfire vulnerabilities. Fire-resistant planning uses noncombustible or fire-resistant materials to reduce risk.
A whole-house view of risk
Home hardening is more than choosing one type of siding. A useful plan reviews how the roof, vents, eaves, windows, siding, decks, gutters, and foundation edges work together. It also looks for gaps or spots where dry debris may collect.
For example, a roof update should consider both the main roof covering and nearby openings. Golden Heights Remodeling’s fire-resistant roofing upgrades can be planned alongside vent, gutter, and eave work. This helps avoid treating one part while leaving an easy path for embers.
The same approach applies to windows and outdoor areas. Glass, frames, nearby fencing, and planting beds can affect the home’s weak points. Reviewing these links early helps the design team set priorities around the home’s condition, layout, and planned scope.
Planning guidance versus code advice
Home-hardening guidance helps owners ask better questions and compare remodeling choices. It does not replace project-specific code review. Bay Area requirements can depend on the address, work scope, permit type, and the local agency reviewing the plans.
A concept plan may flag roofing, vents, windows, exterior walls, and landscape edges for closer review. The team can then confirm required details before products are ordered or construction begins. Golden Heights Remodeling’s design and planning process provides a place to coordinate those choices with the broader remodel.
For homeowners, this distinction keeps early planning useful without treating general guidance as a code decision. Final assemblies, materials, and permit details should be checked for the specific property by the appropriate licensed professionals and local reviewers.
Which exterior materials can reduce wildfire vulnerability?
Material choices can reduce weak points where embers, heat, or flames reach a home. For fire resistant home remodeling Bay Area projects, treat the exterior as one connected system. The roof, walls, edges, and attached outdoor features should work together.
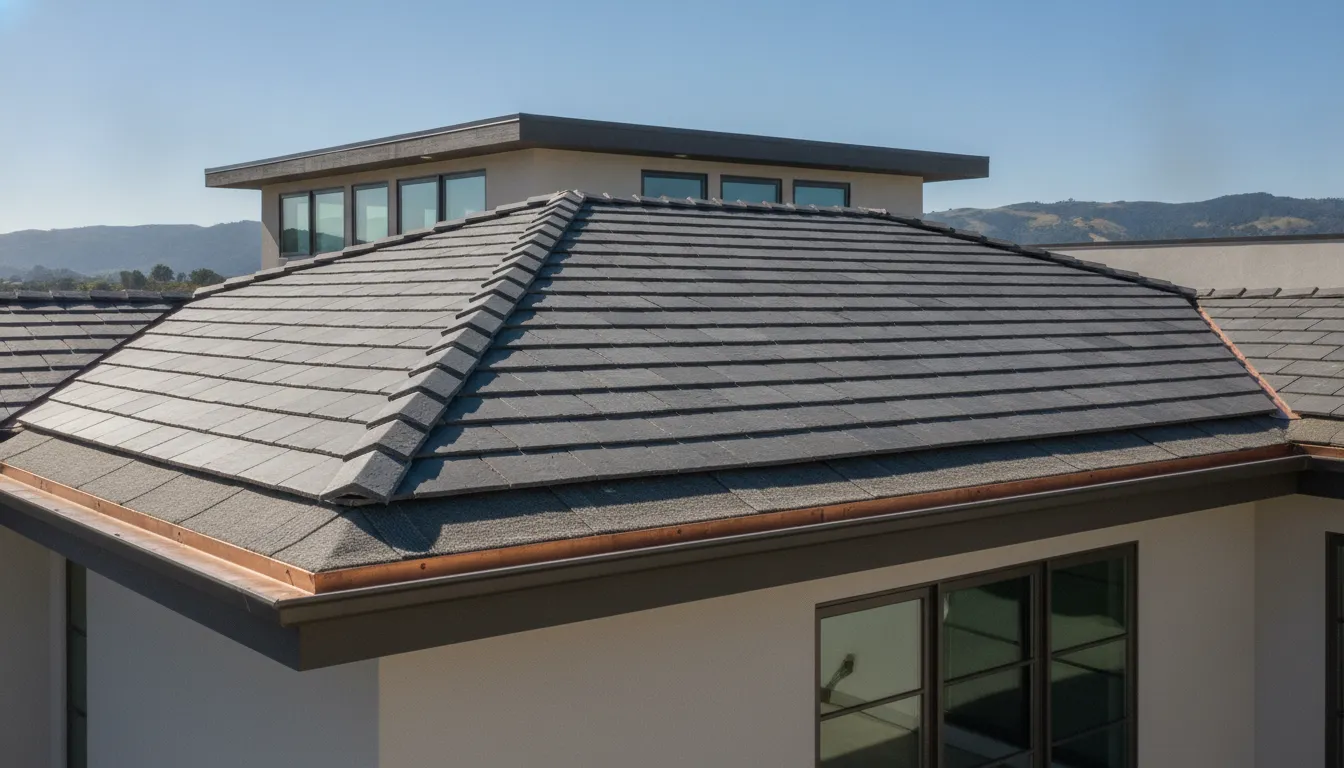
Roof assemblies and rooflines
Start with the roof because windblown embers can land across its broad surface. Metal, tile, and Class A shingles are common fire-resistant options. A complete assembly also needs careful flashing, sealed gaps, and sound underlayment. Golden Heights Remodeling can plan fire-resistant roofing upgrades around the home’s existing structure and design.
The roof edge deserves equal attention. Metal gutters and gutter guards can limit places where dry debris gathers near roofing. Boxed eaves made with metal, stucco, or cement board can also reduce exposed edges. Texas A&M Forest Service lists these roofline measures in its fire-resistant construction guidance.
Exterior walls and exposed edges
Wall materials form the next protective layer. Options include stucco, metal, brick, stone, block, and cement board siding. Installation details matter as much as the finish itself. Open joints, damaged trim, and gaps at wall transitions can leave places for embers to settle.
A design-build review can map these materials across the whole exterior before work starts. That approach helps align siding, roof edges, trim, and foundation skirting. It also lets the team preserve the home’s style while reducing avoidable weak points. These choices can be part of a broader fire-resistant home remodeling plan.
| Exterior area | Material direction | Key detail |
|---|---|---|
| Roof | Metal, tile, or Class A shingles | Close gaps and use sound flashing |
| Gutters | Metal gutters and gutter guards | Keep channels clear of dry debris |
| Eaves and edges | Metal, stucco, or cement board | Box in exposed edges |
| Exterior walls | Stucco, masonry, metal, or cement board | Seal joints and transitions |
| Deck underside | Noncombustible skirting | Limit ember access below |
| Fence connection | Stone or metal break | Separate wood from the house |
Deck and fence connections
Decks and fences need special care because they can connect the yard directly to the building. Focus first on the points where these features touch exterior walls. A stone or metal break can separate a wood fence from the house. Noncombustible skirting can help limit ember access beneath a deck or raised foundation.
Material upgrades should not create hidden maintenance problems. Keep deck boards, wall joints, and fence connections easy to inspect and clean. During planning, a licensed professional should confirm which products suit the home, site, and local project requirements. This review avoids unsupported assumptions about any single product or assembly.
How do vents, windows, and doors affect home hardening?
Openings can shape how well a home resists wind-driven embers during a wildfire. Vents, eaves, windows, doors, and small gaps all need close review. For fire resistant home remodeling in the Bay Area, these details should be planned as one connected exterior system.
Vents, eaves, and hidden gaps
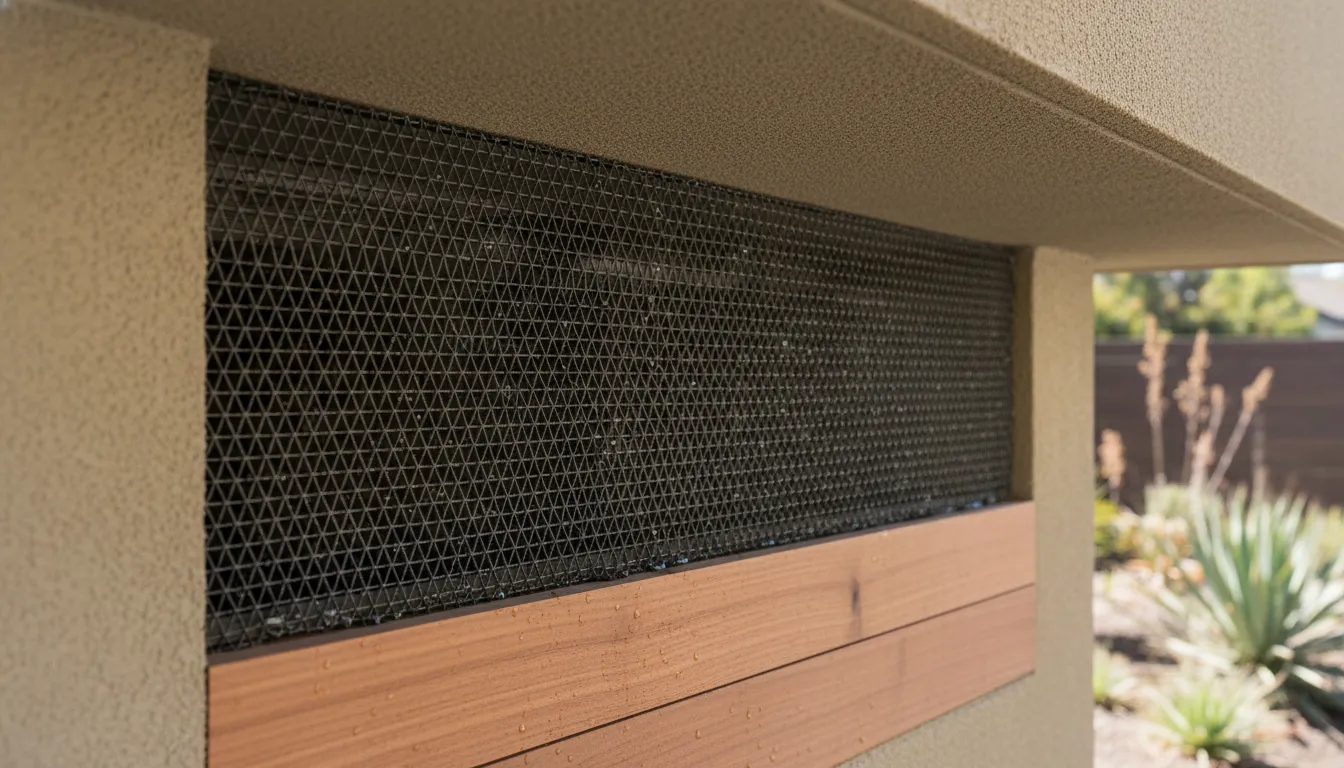
Vents allow needed airflow, but they can also create a path into an attic or crawlspace. Once inside, embers may reach exposed materials that are hard to see from outdoors. A home-hardening review should cover attic, foundation, gable, and soffit vents instead of checking only the most visible openings.
The Texas A&M Forest Service recommends installing 1/8-inch metal screening behind vents. Screens and approved ember-resistant vent products must still support the airflow required for the home. A licensed professional can confirm that a chosen product fits the vent type and local rules.
Eaves and joints also deserve attention. Boxed-in eaves made with non-combustible materials can limit places where heat and embers collect. During a remodel, the team should inspect transitions around trim, pipes, cables, siding, and roof edges for open seams.
- Check vent screens for damage, rust, loose edges, and blocked airflow.
- Review open eaves and exposed framing for suitable enclosure options.
- Seal small construction gaps with products approved for that location and use.
Window glass and complete assemblies
Glass is only one part of a window opening. Frames, seals, hardware, nearby trim, and installation gaps also affect the finished assembly. Fire-resistant construction guidance recommends double-paned or tempered-glass windows to help resist intense wildfire heat.
Tempered glass is made to handle stress better than standard glass, but the right choice depends on the whole opening. Window size, frame material, placement, and code needs should guide the final specification. Homeowners considering fire-rated window installations should compare complete systems, not glass labels alone.
Replacement work is also a chance to inspect the wall around each opening. Proper flashing, fitted trim, and compatible sealants help close gaps without causing drainage problems. A design-build team can coordinate these details with siding and interior finish work.
Doors and the spaces around them
Exterior doors include several connected parts: the door slab, frame, threshold, weather seals, glass, and hardware. A strong slab cannot correct a wide gap or a worn seal. Garage-to-home doors and exterior utility doors should also be included in the review.
Upgrade choices must fit the wall, opening size, and expected daily use. Doors with glass need the same careful review as windows. Where a product carries a fire rating, confirm that the frame, hardware, and installation method are compatible with that rating.
- Inspect weather seals and thresholds for visible gaps or damage.
- Check glass, frames, and hardware as one door assembly.
- Coordinate replacement doors with siding, trim, and permit requirements.
These opening upgrades work best when they are specified early in the remodel plan. Early coordination helps the contractor match products, flashing, finishes, and required inspections before installation begins.
Why the first five feet around the home matter
When embers reach a property, the edge where plants and structures meet can expose weak points. The first five feet around the home connect landscaping with siding, vents, foundations, decks, and fences. Treating this area as part of the remodel helps the building and yard work together.
The building-landscape connection
Fire-resistant construction includes keeping the immediate area around a home free of debris and addressing places where embers may enter. This home-hardening guidance makes routine yard care part of the home’s protection plan. At ground level, leaves and dry plant matter can gather against siding, steps, and foundation vents.
A remodel should examine these connections before new finishes or plants are selected. The plan can coordinate hard surfaces, planting areas, drainage, foundation details, and access for upkeep. It should also review where a wood fence, gate, or deck joins the house. A noncombustible break can help keep these outdoor features from creating a direct path to the structure.
A practical five-foot zone
The closest zone should be simple to inspect and maintain. That does not mean the entry must look bare. Thoughtful fire-smart landscaping interfaces can use clear spacing and well-placed hardscape while supporting the home’s design. Material choices should also account for drainage, heat exposure, and daily use.
- Keep fallen leaves, needles, bark, and other loose debris away from walls and foundation edges.
- Check corners, steps, planters, and the spaces beneath decks where dry material may collect.
- Avoid placing combustible storage, wood piles, or movable furnishings against the building.
- Inspect fence and deck connections, then consider a stone or metal break where appropriate.
- Keep the area accessible so routine cleanup does not become difficult or easy to delay.
Maintenance after the remodel
A well-planned interface still depends on regular care. Plants grow, mulch shifts, and wind carries debris into small gaps. Homeowners should set a simple inspection schedule and add checks after storms, yard work, or long dry periods. Gutters, vents, deck undersides, and foundation edges deserve attention because debris can return quickly.
Before construction begins, homeowners must verify current local and California requirements for their property. Rules may differ by location, site conditions, and project scope. The design team should confirm applicable requirements during planning and permitting, then reflect them in the landscape and building details. This step keeps fire resistant home remodeling in the Bay Area tied to the site’s actual needs.
Talk with Golden Heights Remodeling about a coordinated home-hardening plan
How to plan a fire-resistant remodel
A strong plan treats fire safety as a whole-home system, not a list of separate products. Roof edges, vents, windows, siding, decks, and landscaping must work together. This approach also helps the project team set priorities before design and permit work begins.
Start with risk and scope
Begin with a site and building assessment led by qualified local professionals. The review should map likely ember entry points, combustible connections, and weak exterior materials. It should also note any planned layout, energy, or structural changes that could affect the work.
Next, confirm local code, permit, and inspection needs with the city or county. Code compliance sets a baseline, but the plan may need added measures for the home’s site and exposure. A design-build team can coordinate those decisions through a fire-resistant home remodeling project.
- Assess the property. Inspect the roof, vents, eaves, siding, windows, decks, fences, foundation edges, and nearby planting. Record damage, gaps, and combustible parts.
- Check local requirements. Confirm the rules that apply to the address before selecting assemblies or finishes. Ask which permits, product records, and inspections the project will require.
- Set the project scope. Rank upgrades by exposure, condition, and how well they fit with other remodel goals. Put hidden work and hard-to-reach areas early in the schedule.
- Design the exterior envelope. Coordinate the roof, gutters, vents, eaves, siding, windows, doors, and foundation edges as one system. This reduces gaps where embers may enter or collect.
- Plan exterior connections. Review decks, fences, stairs, and attached structures that could carry fire toward the house. Specify safe transitions and noncombustible breaks where a professional recommends them.
- Build in upkeep. Create a simple schedule for clearing debris, checking screens, and repairing gaps. Assign each task a season and a clear trigger for professional service.
Prioritize the envelope
The roof and its edges often deserve early attention because they cover the full structure. Qualified professionals may recommend metal, tile, or Class A shingles based on the home and local rules. The same review should cover gutters, roof-to-wall joints, and fire-resistant roofing upgrades.
Vents, eaves, windows, siding, and foundation edges form the next layer of protection. Texas A&M Forest Service guidance recommends measures such as screened vents, enclosed eaves, and heat-resistant siding. Its fire-resistant construction guidance also stresses keeping the area near a home free of debris.
Coordinate construction and maintenance
Build the schedule from the outside inward. Complete structural repairs and concealed envelope work before installing finishes that could hide gaps. Coordinate related roof, window, siding, and landscape work so one trade does not weaken another trade’s detail.
Before final inspection, document product details, completed assemblies, and the maintenance plan. Walk the exterior with the project team and note areas that need regular checks. Fire-resistant home remodeling in the Bay Area works best when sound construction is paired with steady upkeep.
Which upgrades should Bay Area homeowners prioritize first?
Start with the parts most likely to let embers or heat reach the house. Then weigh their condition, planned remodel work, and available budget. This approach keeps fire resistant home remodeling in the Bay Area focused on the home’s actual weak points.
Roof condition and ember entry points
An aging or damaged roof should usually lead the list. Cracked materials, open edges, and debris traps can create avoidable weak spots. Review the roof covering, gutters, vents, eaves, and nearby attachments as one connected system.
Fire-resistant roof materials include metal, tile, and Class A shingles. The same CAL FIRE home-hardening guidance also calls for metal screening behind vents and non-combustible boxed eaves. A licensed professional can confirm which details suit the home’s structure and local rules.
If the roof needs repair or replacement soon, combine that work with related hardening measures. Coordinated fire-resistant roofing upgrades may avoid reopening finished areas later. A sound newer roof may shift the first phase toward vents, gutters, or exposed edges instead.
Weak points around the exterior
After the roof, inspect places where wind-blown embers can enter or collect. Common review areas include windows, siding gaps, decks, fences, foundation skirting, and landscaping beside the house. Conditions vary, so the order should follow the home’s site and exposure.
- Address openings and gaps that could admit embers.
- Separate combustible fences or deck features from the house where practical.
- Replace failing exterior materials when their condition already calls for work.
- Clear dry debris near the home and roofline.
Do not treat every exterior feature as equally urgent. For example, worn siding with open joints may rank above sound windows. A wood fence touching the house may also deserve attention before a detached feature farther away.
Planned work and budget phases
Use upcoming renovations to set the most practical sequence. Window replacement creates a natural time to review glass, frames, trim, and nearby siding. A larger fire-resistant home remodeling plan can coordinate exterior details before finishes hide access.
When the budget requires phases, fund the highest-risk repairs and ember entry points first. Next, group upgrades that share labor, permits, or access. Lower-risk finish changes can wait until core weak points are addressed.
A design-build review can map those phases against the roof’s remaining condition and planned renovations. It should also flag choices that need confirmation from a licensed professional. That plan helps homeowners compare tradeoffs without assuming every upgrade belongs in the first phase.
Permits and local requirements to check before remodeling
Start with the right local offices
Permit needs for fire resistant home remodeling in the Bay Area depend on the property, planned work, and reviewing agency. Before design begins, confirm which city or county building department has authority over the address. Also ask whether a local fire authority must review the plans.
Share a clear scope with both offices, including proposed changes to roofing, vents, windows, siding, decks, and landscaping. This detail matters because California wildfire building guidance to reduce wildfire risk. Ask each agency which permits, plan notes, product records, and inspections may apply.
Check the property’s WUI status
A property in or near a wildland-urban interface, often called a WUI, may face added review. Do not assume the same rules apply across Concord, Oakland, Walnut Creek, San Ramon, Orinda, or nearby unincorporated areas. Confirm the current WUI designation and requirements directly with the agencies that serve the property.
Review how the proposed exterior work fits together before submitting plans. Roof edges, vents, walls, windows, decks, fences, and planted areas can affect one another. A coordinated fire-resistant home remodeling plan helps the design team show these connections in one clear scope.
Plan for review and inspections
Build agency review time into the project schedule, and expect questions or plan changes before approval. Product choices may need supporting records, while concealed work may need inspection before finishes cover it. Ask the building and fire authorities when inspections should occur, then keep those steps in the construction schedule.
A permit or approved plan does not promise that a home will resist every wildfire event. It also does not replace ongoing upkeep around roofs, gutters, vents, decks, and planted areas. Verify current rules before work starts, since requirements and review steps can change.
Keep written answers, approved plans, product records, and inspection notes together throughout the remodel. This record helps the owner, designer, contractor, and inspectors work from the same information. When the scope changes, ask the reviewing agencies whether revised plans or added approval are needed.
Frequently Asked Questions
What are the most effective materials for fire-resistant home remodeling in the Bay Area?
Effective choices include Class A roofing, metal or tile roofing, cement board or metal siding, and noncombustible eave finishes. Double-pane or tempered-glass windows and properly screened vents also reduce vulnerable openings. The Texas A&M Forest Service recommends selecting materials as part of a complete home-hardening plan, not as isolated upgrades.
How much does it cost to make a home fire-resistant during a remodel?
The cost depends on the home’s size, condition, fire-risk zone, and the upgrades included in the remodel. Replacing roofing or siding usually costs more than screening vents or separating a wooden fence from the house. A contractor should inspect the property, confirm local requirements, and price the improvements within the full remodeling scope.
Does meeting local building codes make my home fire-resistant?
Meeting current building codes can improve a home’s wildfire resistance, but it does not make the property fireproof. Codes establish minimum requirements and may vary by location, project scope, and hazard zone. A thorough plan should also address embers, roof edges, vents, windows, decks, fences, and nearby combustible debris after local code requirements are confirmed.
Can I make my existing home more fire-resistant during a remodel?
Yes. An existing-home remodel can address several weak points without rebuilding the entire structure. Common upgrades include fire-resistant roofing and siding, enclosed eaves, tempered or double-pane windows, and metal screening behind vents. The Texas A&M Forest Service recommends 1/8-inch metal screening behind vents to help limit ember entry.
Ready to Plan a Safer Bay Area Remodel?
Waiting to address vulnerable exterior details can leave your remodeling budget focused on finishes while key safety priorities remain unresolved. Starting now gives your design-build team time to review roofing, windows, vents, exterior materials, and landscaping connections before construction begins. Early planning also helps align the scope, permit needs, material choices, and project phases before avoidable changes disrupt the schedule.
Take the first step by discussing your home’s current weak points, your renovation goals, and the improvements that fit your planned scope. Golden Heights Remodeling can help organize those priorities into a clear design-build plan for your Bay Area home. Ready to move forward? Schedule a remodeling consultation to begin planning a safer, better-coordinated remodel.