
A noisy Bay Area street can make even a luxury home feel like a high-stress office. Traffic and loud neighbors disrupt your peace and lower your quality of life. A soundproofing home remodel can address these issues while the structure is already open for work.
A professional soundproofing home remodel helps you block outside noise and keep interior rooms private by using smart building steps. The best time to add these features is during a renovation because we have full access to the wall studs and floor joists. We can add dense insulation, install thick drywall, or use special clips to stop sound from moving through the house. Research from the NIH shows that decoupling is a top noise control method because it separates the wall surface from the framing. This creates a quiet space where you can work or relax without hearing what is happening in the next room or the street. By choosing the right materials now, you ensure your home stays peaceful for many years.
Planning your soundproofing early saves you time and money. It allows you to address the root causes of noise while your home is open for work. Our guide on Why a remodel is the best time to control noise shows you how to plan your project. The path begins with
Soundproofing Home Remodel: Why a remodel is the best time to control noise
Remodeling your home is the best time to fix noise issues. When you tear down walls or pull up floors, you can see the inner frame of your house. This is a great time for incorporating soundproofing into your remodel plan. It is much easier to add sound barriers when the wall studs are bare and easy to reach. If you wait until your project is over, fixing a loud room will cost much more and take more work. You would have to rip out new paint and drywall just to reach the inside of the wall.
A soundproofing home remodel lets you build peace and quiet into the very structure of your house. This helps your home feel more private and calm. It also adds value to your house in the San Francisco Bay Area. Buyers often look for homes that offer a quiet escape from the busy world outside. Planning now saves time and money while making your home better.
The benefit of open walls and floors
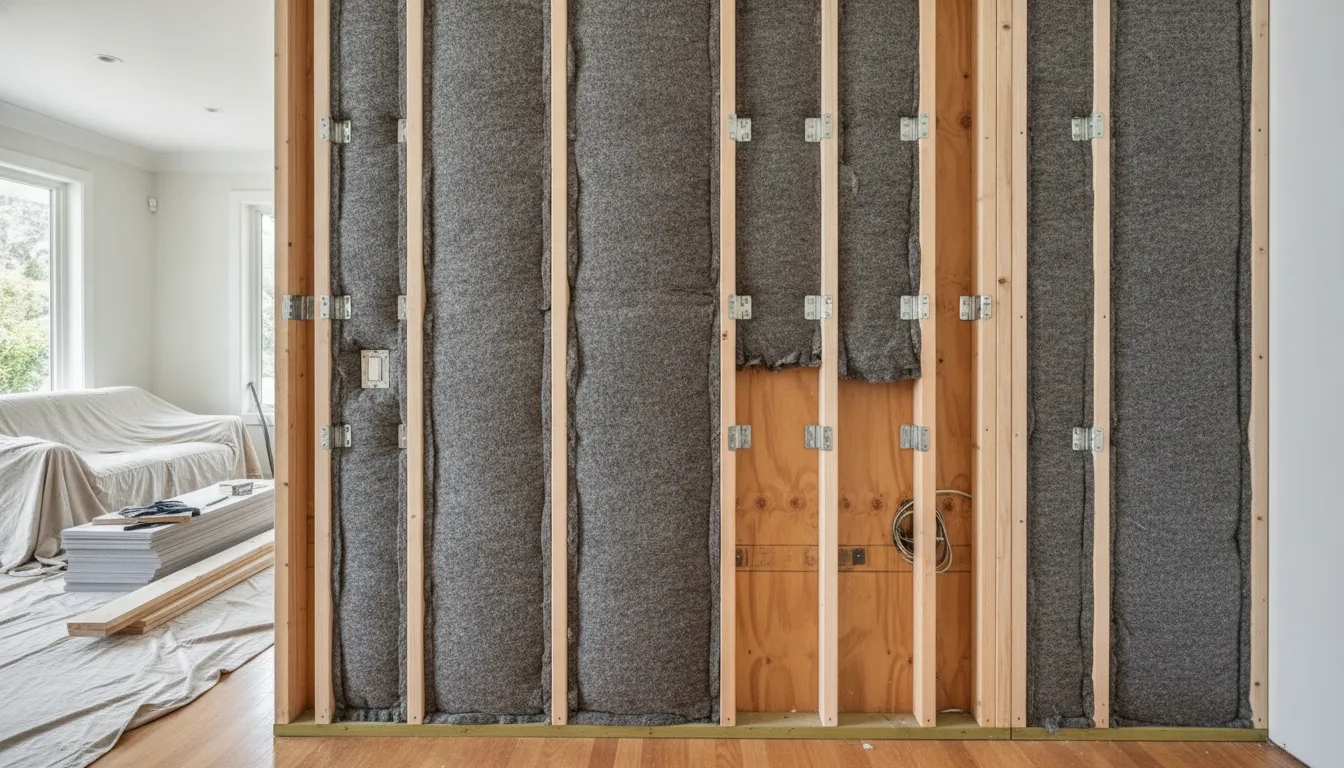
Open walls give you a chance to use a method called decoupling. This process keeps the drywall from touching the wood frame. You can use small metal clips or channels to create a tiny gap. This gap stops sound from moving through the wall studs. As experts say, decoupling is one of the best ways to stop noise in a building. It breaks the path that sound takes as it tries to go from one room to the next.
You can also add mass to your walls while they are open. Heavy materials make it much harder for sound waves to move the wall. When you make a wall twice as heavy, you can block much more noise. Some studies show that doubling the mass of a wall can cut sound spread by about 6 dB. You can do this by using thicker drywall or adding special layers inside the wall. Since the walls are already open, you do not have to worry about the mess of a new project.
Finding the types of noise in your home
To choose the right tools, you must find out what kind of noise you have. There are two main types: airborne and impact. Airborne noise moves through the air, like voices or music. You can block these sounds by sealing gaps and adding heavy materials to your walls. Impact noise comes from something hitting a surface, like footsteps or a slamming door. Stopping this kind of noise usually needs a soft layer to soak up the energy.
You might use thick pads under your new floors to keep the downstairs quiet. Knowing these two types of noise helps you pick the best materials for your home. You can then spend your money on the things that will help the most. Whether it is adding foam to the floor or wool to the walls, knowing your noise type is the first step.
How to pick the right rooms
You do not need to soundproof every room in your house. Focus on the spaces where you need quiet the most. Bedrooms are usually the best place for most people. A quiet room helps you sleep better and feel more rested. Home offices are also key if you work from home. You need a quiet place to take calls without hearing the rest of the family.
Media rooms are another good spot for soundproofing since they can be very loud. You want to keep that sound from spreading to the rest of the house. Before you start, schedule a consultation with our team. We can help you decide which rooms need the most care.
Which wall soundproofing upgrades work best?
Soundproofing a wall is a key part of any home remodel. Most people want to keep noise from moving between rooms. This is very helpful when you plan a soundproofing for multi-generational privacy to ensure quiet spaces for everyone. To get the best results, you must use three main steps. These steps are adding mass, soaking up noise, and decoupling the wall frame. Each step works in a different way to stop sound waves.
Decoupling and staggered studs
One of the most powerful tools for adding soundproofing to your remodel plan is decoupling. Sound travels through solid objects like wood studs. If you break this path, the noise cannot pass easily. Many decoupling methods use special clips or channels to separate the drywall from the wall frame. This stops shakes from moving from one side of the wall to the other.
Staggered studs are another smart choice. In a normal wall, the same stud touches the drywall on both sides. This creates a bridge for sound to cross. Staggered studs use two sets of studs that do not touch the same face of the wall. This breaks the link and makes the wall much quieter. Research shows that double-leaf walls provide much better sound control than single-leaf walls. This is because they have a gap that acts like a buffer for air noise.
Proper set up is vital for these parts to work. If a screw touches the frame by mistake, the sound will leak through. This is called a bridge. Bridges bypass the clips and let sound pass. To avoid this, you should plan your wall layout early in the design phase. Fixing noise issues later is much more costly and less helpful for the home. Most pros use sound design metrics to check how well these systems work during the build.
Adding mass and absorption
Mass is the weight of the wall. Heavy walls are harder to move, so they block sound better. Doubling the mass of a wall can increase its sound loss by about 6 dB. You can add mass by using two layers of dense drywall. This is a simple way to make a big change in how much noise you hear. Using heavy materials is a core part of building science for controlling noise in your home.
Absorption fills the gaps inside the wall. Most walls have empty air space. This air can act like a drum and make sound louder. Filling this space with mineral wool helps soak up the energy. Rockwool is a popular choice for this job. It is much denser than standard pink glass batts. When you combine high-density batts with thick drywall, the wall becomes much more solid. This helps block talking or TV noise from moving between rooms.
Damping is the third pillar of this work. You can use a special glue between two layers of drywall. This glue acts like a shock absorber. It stops the wall from shaking like a bell when sound hits it. This turns the sound energy into tiny amounts of heat. Using mass, absorption, and damping together creates a wall that blocks both high and low sounds.
Air sealing and finishing
Small gaps can ruin even the best soundproofing work. Sound is like water and will find any hole or crack to move through. This is why air sealing is so vital. You must use sound sealant to fill gaps around outlets, switches, and baseboards. Even a tiny leak can lower the work of the whole wall. High-quality seals around doors and windows are also needed to keep noise out of your space.
Solid core doors are much better than hollow ones for stopping sound. You should also add seals to the door frame. These seals block air from passing when the door is closed. For windows, adding an extra pane of glass can help a lot. This adds mass and makes the window more air tight. These small details ensure the wall works as a full system to block noise.
When you finish the wall, check for any missed spots. Use the sealant in every corner and joint. This step takes time but it makes a huge change. These upgrades help you get the most out of your home remodel. By using the right steps, you can create a quiet and private space for your family.
| Method | Primary Action | Best For | Skill Needed |
|---|---|---|---|
| Acoustic Insulation | Fills wall cavity | Stopping echoes | Low |
| Double Drywall | Adds wall mass | Blocking voices | Medium |
| Isolation Clips | Decouples frame | Low-bass noise | High |
| Acoustic Sealant | Blocks air leaks | Small gaps | Low |
| Damping Glue | Soaks up vibration | Quiet walls | Medium |
How can floors and ceilings reduce impact noise?
Stopping noise from moving between floors is a top goal for a soundproofing home remodel. In a house with many levels, you often hear people walking or things dropping above you. This is called impact noise. It happens when something hits a surface and sends a vibration through the wood or metal frame of your house.
To stop this, you need a plan that uses mass, damping, and decoupling. Sound often takes the path that is easiest through gaps or solid parts of the frame. Without the right materials, even a small vibration can travel a long way. This is why a full design that covers every layer is so important for a quiet home.
Understanding impact versus airborne noise
There are two main types of noise to block in your home. Airborne noise comes from things like voices, music, or the TV. Impact noise comes from physical contact with the floor. While heavy rugs can help with sound within a room, they do little to stop sound from moving to the room below.
According to the Centers for Disease Control and Prevention, noise control requires you to address all possible paths sound can take. You must look at how the floor and ceiling work together to stop leaks. This full view helps you find the weak spots in your home before you start the work.
Choosing acoustic underlayment and finishes
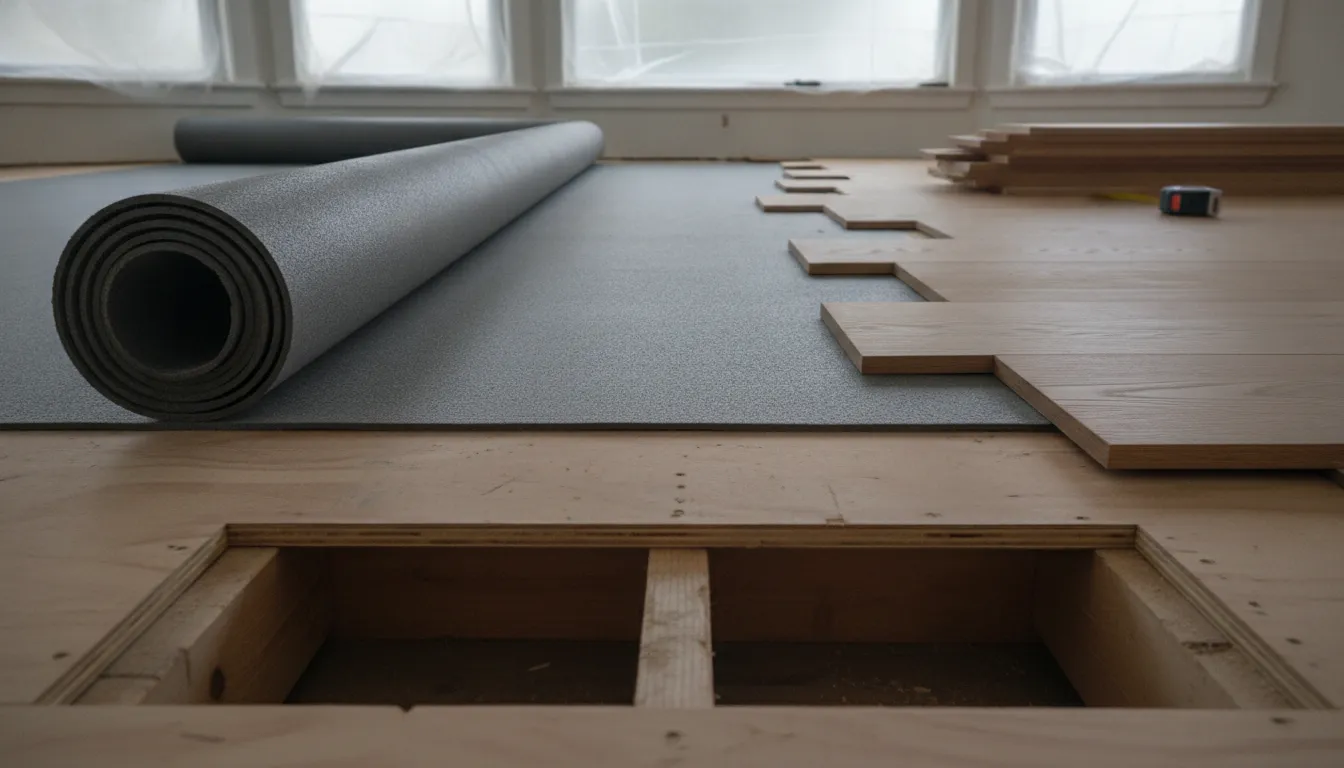
The first step in floor soundproofing is to use the right underlayment. This is a thin layer of material that sits between your subfloor and your final floor. Acoustic foam floor underlayment is a great choice because it helps soak up the energy from footfalls. This stops the vibration before it ever reaches the frame joists of your house.
When you look for noise-reducing flooring materials, think about the density of each layer. Heavier materials generally block more airborne sound. But for impact noise, you need something that can flex and absorb. Hard surfaces like tile or wood tend to carry sound well, so they need extra help to stay quiet.
Using high-density rug pads or thick cork can also help. These materials act like a cushion that breaks the path of the sound wave. This is a simple way to make a big difference without a full teardown. You should think about your floor finish early so you can pick the best match for your needs.
Decoupling ceilings and insulation
Another powerful way to quiet your home is to decouple the ceiling from the floor above. Decoupling means you separate two parts of a structure so vibrations cannot pass through them easily. One common tool for this is the resilient channel. The National Institutes of Health notes that decoupling is one of the most effective ways to control noise in buildings.
Filling the space between the floor joists with insulation is also key. Using high-density batts, like mineral wool, can stop sound from bouncing in the open cavity. This works much like a sponge that catches the noise before it moves into the next room. You must seal any gaps around pipes or wires with acoustic caulk to keep the air tight.
Adding mass to the ceiling by using two layers of drywall is another step. Putting a layer of sound-dampening glue between the sheets can help even more. This glue turns the energy of the sound wave into heat. Proper order of work is vital, so make sure to install these layers after all electrical work is done.
Do new windows and doors make a home quieter?
Old windows and doors are often the weakest spots in a house. They let in loud cars, wind, and voices from the street. When you start a soundproofing home remodel, you must look at these areas. New units do more than just lower your power bills. They can also make your rooms more calm. Thick glass and tight seals work well to block out loud noise.
Why sound leaks through glass and gaps
Most noise gets in through thin glass or small air leaks. Sound waves pass right through single-pane glass because it has low mass. Even a tiny crack or gap can ruin a quiet room. These small holes act like a door left open for sound. Sound leaks through small gaps can ruin your peace. You must seal every edge to get the best results.
Air leaks often hide near old seals. Over time, these parts can dry out and shrink. This creates paths for sound to enter your home. During a remodel, we check for these weak points. Fixing them is a key step to make your house quiet. Good seals help you get the most out of your new units.
Picking the right glass for sound control
Not all glass is the same when you want to block noise. Single panes of glass offer no help. Double or triple panes are much better for a quiet house. Each extra layer of glass adds mass. It also creates a gap that slows down sound waves. Adding extra panes or laminated glass can stop a lot of loud noise. This is a great pick for homes near busy roads.
Laminated glass uses a thin plastic layer between two sheets of glass. This layer helps stop the shakes that turn into sound. It works well for high sounds like sirens or dogs barking. This is one of the best ways to keep your home calm and still. If you want a more quiet home, you can schedule a consultation with us today.
You should also look for windows with glass of two widths. When panes are the same size, they shake at the same rate. This can let some sounds pass through easily. Using panes of two widths helps block more types of noise. It is a smart way to get the best value for your cost.
Why solid doors matter for privacy
Doors inside and outside your house play a big role in keeping it quiet. Many standard doors are hollow and filled with air. These act like a drum that carries sound from room to room. If you want a quiet space, you need a door with more mass. Solid-core doors are much heavier and block sound much better. They are a must for bedrooms and home offices.
A new door can stop noise from moving through your house. But the door itself is only part of the fix. You also need to seal the space around the door frame. Sound can leak through the gap at the bottom or the sides. We use heavy seals and door sweeps to close these paths. This keeps noise in one room so it does not bother the rest of the family.
Good setup is the last step for a quiet home. Even the best door or window will fail if it is not put in right. We make sure every unit is level and sealed tight to the frame. This stops leaks and makes sure the product works its best. An expert touch makes all the change in your home’s noise levels.
Plan the layout around quiet and noisy zones
Noise control works best when you think about it early. The CDC notes that you should plan for noise at the start of your design. When adding soundproofing to your remodel plan, you can use the shape of the house to block noise. You can make a home feel much more private by placing rooms in the right spots.
Group rooms by noise levels
Start by making a map of “quiet zones” and “noisy zones” in your floor plan. Quiet zones include your bedrooms, home office, or baby room. Noisy zones are spots like the kitchen, gym, or media room. You want to keep these areas as far apart as possible. If a bedroom wall touches a loud living room, it will be hard to find peace. This is a common issue for families who need soundproofing for multi-generational privacy in the Bay Area.
You should also think about the noise that comes from outside your home. In busy spots like Oakland or Walnut Creek, street noise can be loud. Place your bedrooms toward the back of the house or facing a quiet side yard. Keep active rooms like the dining area or laundry room near the front street side. This uses the less-used rooms as a shield for the spaces where you sleep or work. Research shows that sound travels through building paths, so moving the source further away is the first step in stopping it.
Use closets and hallways as buffers
You can use small, extra spaces to create a “sound airlock” between rooms. Closets are great for this because they add a lot of mass. A row of closets full of clothes between a bedroom and a living room acts like a big sound shield. This extra depth stops noise from moving straight from one space to the next. Hallways and bathrooms can also serve as buffers. Place a bath or a walk-in closet against a shared wall. The noise must then pass through many layers before it reaches your ear.
Think about how doors line up in your hallways too. If two bedroom doors face each other across a hall, sound can travel straight across. Offsetting the doors so they do not align can help break that path. You can also use bookshelves or built-in cases on shared walls to add mass. These items help dampen sound before it can vibrate through the frame of your home.
Plan your machine systems
Loud sounds do not just come from people or TVs. Machines like your HVAC unit, dishwasher, and laundry machines create steady noise. You should place these units away from quiet areas. Do not put a laundry room or furnace closet next to a main bedroom. Also, consider the pipes and vents. Sound can travel through metal ducts and plastic pipes quite easily. Working with a pro helps you find paths for these systems that stay clear of quiet rooms.
Noise also travels fast through open spaces. If you have a large home, handling noise in open floor plans needs careful planning. You might use low walls or kitchen islands to break up the sound waves. Even a small turn in a hallway can help trap noise before it spreads. By thinking about all the paths sound can take, you create a home that feels solid and calm. This full view ensures that every part of your remodel works together to give you the quiet you want.
How to plan soundproofing into a home remodel
Planning for noise control at the start of your project is far better than trying to fix it later. Many people wait until the walls are closed to think about sound. But fixing noise issues after a remodel is often hard and costs a lot. When you start a full home remodeling project, you have a rare chance to add mass and decoupling inside the structure itself. This early focus helps you get the best results for your budget.
A good plan looks at how sound moves through your specific home layout. It is not just about the walls. Sound also finds paths through floors, ceilings, and gaps around pipes. You should work with a design-build team to map out these paths before any demo begins. This ensures that every part of the build works together to block noise. Take time to add soundproofing to your remodel plan early to save you from regrets later.
Talk with Golden Heights Remodeling about coordinating soundproofing with your full-home remodel.
Find your noise sources
The first step in planning is to find where the noise comes from. Walk through each room and listen for outside traffic, loud neighbors, or noisy pipes. You should also think about noise between rooms, like a home office next to a kitchen. Finding these spots early helps you choose the right tools for each area. Noise control should be part of the earliest stages of design to work best.
Do not forget to check the weak links in your home shell. Windows and doors are often the spots where sound leaks in the most. Adding thick glass or a solid-core door can make a big change. If you map these paths now, you can budget for the right materials before the work starts. This full view is the best way to ensure your home stays quiet and private.
Prioritize the right upgrades
- For voices and television noise: add cavity insulation, seal gaps, and increase wall mass.
- For footsteps and dropped objects: use acoustic underlayment and isolate ceilings where practical.
- For street noise: evaluate windows, exterior doors, seals, and wall assemblies together.
- For mechanical noise: plan equipment placement, duct routes, and vibration isolation before finishes go in.
Once you know the problem areas, you must pick the best fix. Good sound control usually needs a mix of mass, damping, and air-sealing. Adding mass means using heavy materials like thick gypsum board to block sound. Damping helps absorb vibrations so they do not ring through the wall. You can also use mineral wool to fill wall cavities for better sound absorption. These choices depend on your goals and the existing building structure.
Decoupling is another key way to use during a soundproofing for multi-generational privacy project. This means splitting the drywall from the wall studs so sound cannot travel directly through the frame. You might use resilient channels or sound isolation clips to do this. Decoupling is very good at stopping both loud voices and thumping sounds from next door.
Following a clear sequence keeps your project on track. Here are the steps to plan your soundproofing remodel:
- Perform a noise audit of your home to find where sound is loudest and how it moves through the walls.
- Set clear goals for each room, such as blocking street noise or making a quiet home office for work.
- Work with your design team to pick materials like mass-loaded vinyl or double layers of drywall to add mass.
- Plan for decoupling using clips or staggered studs to break the path of sound vibrations through the frame.
- Verify that your plan includes air-sealing for all gaps, as even small cracks can let a lot of noise through.
- Talk with your contractor to ensure they know how to install these expert materials correctly before they start work.
- Inspect the work before the drywall goes up to make sure there are no gaps or errors that will hurt results.
A well-made plan is your best tool for a quiet home. If you are ready to start your project, you can schedule a consultation with our team. We help Bay Area homeowners design spaces that are both nice and quiet. With the right steps, you can turn a noisy house into a peaceful retreat.
Frequently Asked Questions
How can I soundproof an existing home?
Remodeling a home for sound control works best when you mix three ways. You should add mass to walls, split the parts, and seal all air gaps. Based on the CDC, noise control should start in the early plan because fixing issues later is often costly. You can also use solid core doors to lower noise. Good seals around windows will keep sound from leaking through small cracks in the house.
Do I need to stagger studs for better soundproofing?
Staggered studs are a great way to break the path of sound waves through a wall. In a normal wall, sound moves through the wood frame from one side to the other. Setting the studs apart ensures that the drywall on each side is not touching the same piece of wood. This helps block noise between rooms. Research from PMC shows that isolating wall parts prevents sound from passing directly through the frame.
Can I use rockwool for interior wall soundproofing?
Yes, you can use mineral wool like Rockwool to fill the empty spots inside your walls. This material helps soak up sound waves as they travel through the wall. Using dense batts can greatly improve how well a room blocks noise. Based on academic research, filling wall gaps with absorptive material is a key way to boost insulation. It works best when you also add heavy drywall to block more sound.
How does acoustic foam floor underlayment improve soundproofing?
Floor underlayment helps reduce noise from footsteps on the floor above. This material acts as a cushion that splits the top floor from the subfloor below. Experts at the NIH say that decoupling is one of the best ways to control noise in a building. This simple layer helps keep your home quiet by stopping waves before they can move through the wood frame of the house.
Ready to build a quieter Bay Area home?
Ignoring noise control now will lead to high costs and stress later on. You do not want to tear out new walls later just to fix loud rooms. Adding soundproofing after a remodel is done is much harder and takes more time. Building noise control into your plans today is the smart choice. By acting now, you can save money and ensure your new space is quiet and calm. It is the best way to make sure your home feels private and stays peaceful. Check our guide on adding soundproofing to your remodel plan to stay on track for your goal.
Schedule a consultation with Golden Heights Remodeling to start planning a quieter home.
Ready to talk about your kitchen?
Get a free, no-pressure design consultation. We'll walk through your goals, budget, and the upgrades with the best return for your home.